Tuesday, April 24, 2012

Panoramic Photos - The Beginning

I have always enjoyed panoramic photos. I find that the expansive image provides the viewer a better idea on what a certain viewpoint would be like.
There a number of excellent sites with panoramic shots, but one of my favourites is Panoramio (www.panoramio.com). The site enables photographers to take images from all over the world and pin these to google maps. Not only are there some professional photographers but it provides a unique insight into what other parts of the world look like.
There are a number of panorama groups which provide 360 degree images from high points in cities, mountain tops or street views and these are an excellent way to absorb a snapshot of the local area.

Having only just started in panoramic images, I have attached a few which I have stitched together. Just click these to open them into a larger format.

Flat Rock near Tarana NSW

Evans Lookout - Blackheath NSW

Lake Canobolas - Orange NSW

Mount Tarana at distance - Tarana NSW

With both the Tarana images and Blackheath, I took these as horizontal shots. The Orange images from a vertical shot.

I would like to attempt some 360 degree shots in both horizontal plains (From full left to right) and vertical plains ( from front to rear over my head). Not sure how the second would turn out but certainly needs to be in the right location and subject matter for it to have an interesting result.

Saturday, April 21, 2012

More Macro

To continue with the macro photography with the extension tubes, I have taken this:-


Any guesses?

At first glance they look like pebbles or maybe small shells on a net.

Actually, its insect eggs on the fly screen of my lounge room.

Friday, April 20, 2012

Macro Photography with Extension Tubes

I recently purchased from Ebay a set of extension tubes for my Canon.
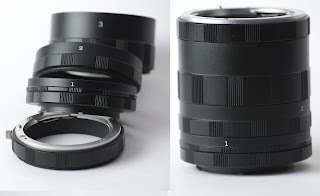
Those not familiar with extension tubes, they are an aluminium tube, normally in sets of 3, which sit between the body and lens of the camera.
Extension Tubes


The use of these tubes provides a less expensive way to experience macro photography.

Though I am still getting a hang of it, I did locate a wealth of information online on their use.

As you apply each extension, the ability to go closer to the subject matter increases.

A quick walk around the backyard of my home, I snapped the following shots but, to put the use of the tubes into perspective, the first image is what can be achieved with the normal 18-55mm lens for macro photography.


The following are the same flower with the tubes attached:-


The following pics are of other subjects in the backyard:-

Ant in Rosemary Flower

Dead Wasp

Dandelion Flower


What I found was that with Canon 400D SLR, I selected AV for shoot setting, then manual adjusted the F-stop to +2. Adjusting into the minus selection created longer exposure times, and with the potential shake from close up photography, increases the room for error.

I look forward to posting more images using this technique shortly.

Tuesday, April 17, 2012

Tweaked Taronga

As indicated in my last posting I have tweaked a few photos in an attempt to make them a little more palatable.

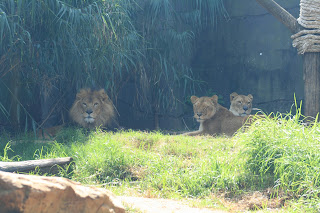
The first is the lion enclosure at Taronga Zoo. I amended the image with the contrast by -70 to provide the second image. The difficulty faced was the full glass panel and morning sun. The result isn't too bad, in my opinion.


 Similar to the last one, and with the glass restrictions, the image was adjusted by -70 with the contrast. The grass is perhaps a little more electrified than I would like but the images of the lioness is much better.


 This was very difficult. The morning sun was directly shining into the chimpanzee area and though somewhat dormant, there was high contrast of light into the area.

I adjusted the contrast by -70 but also made a slight adjustment of exposure by -5. A slight smoothing of the image by +3 resulted in the change.


 Similar to my first posting, this is a simple black and white to colour recovery. The electric colours of this bird paved the way to use the same approach. However, a review of light browns and greys in the original background, there is perhaps no significant change.


Monday, April 16, 2012

Taronga Zoo Outing

Taronga Zoo (http://www.taronga.org.au/taronga-zoo) within the city of Sydney is perhaps one of the better attractions in the capital and one of the greatest for photographers. Over the years it has slowly developed into a well planned and accessible experience.

Locations like this zoo is where a digital camera comes into its ultimate with the ability to take hundreds of photos with the hope of obtaining some perfect shots.

I don't profess to be an expert photographer, but simply enjoy the experience of taking photos.

The following selection is of some which I feel turned out well without the need of manipulation. I will post some of the before and after shots of those which needed some "tweaking".


The difficult I found is using the 75-300 mm lens at full extension and attempting to reduce camera shake. Though I used the side of the fencing, glass walls or posts, the slight shake can be quite noticeable when the lens is at full extension. I am happy for any suggestions on how to reduce this.

The hardest parts I found with this photography was the level of light to the high movement of the animals, the protective glass which was excessively reflective and dissolved the colour of the images, and unfortunately lost a few due to people bumping or placing their heads into the shot.

Overall, as mentioned before, an excellent location for any photographer. I will post more shots of the zoo visit soon.

Saturday, April 7, 2012

Colour Highlights

I recently stumbled upon a program which allows you to convert a photograph to black and white then highlight any colour from the original image.
'Great Photo' from Everimaging (www.everimaging.com) has some excellent imagery programs, with this software package one of the simpliest but very powerful programs.
Nathan's Parade - Kapooka, Wagga Wagga
This is one of my first attempts at using this program, and I do find the results excellent. With the mass of green from the original photo, the image didn't lend itself to individualism. However, I think the final result does this well.

Old Blue - Millthorpe NSW
This is perhaps a more subtle use of the colour inclusion. The original image is quite interesting with the stark blue fireplace surround and the old rusty chair. However, the blackberry bush within the centre of the house and the yellow - mustard walls, it takes away from the other colours. But, with this approach, I feel the viewer is better drawn to the mantle and chair.

Hayley's Formal - Bathurst NSW

Similar to my first picture, with such a large group together, it was difficult to isolate or identify the right person. A much better result from the original, I believe.

Greenery Test
This is one which I feel just didn't work. With a similar concept of the blending of the items in the original image, separation of it in colour doesn't have the same effect as the previous ones. I can't put my finger on it. It may be the lack of colour in the flower, or the size of it.